
Glass Balustrade Resource Guide

Planning a glass balustrade? This guide covers different fixing systems, installation requirements, safety standards and maintenance.
Looking to buy materials? Shop Glass Balustrade Panels, Spigots & Hardware →
01 — Choosing a System
Deck Mount Balustrade
Frameless glass balustrade with spigots mounted on top of the deck, concrete slab or suitable structure.

Side Mount Balustrade — Spigot Fixed
Glass panels fixed to the side of the structure using side mount spigots.

Side Mount Balustrade — Standoff Fixed
A clean side-fixed system using stainless steel standoff fittings to secure the glass panels.

Glass Stair Balustrade
Custom toughened glass panels designed to suit stair angles and different fixing systems.

02 — Installation Guides
Before You Start
Measure the full balustrade area and confirm the fixing system before ordering.
Mark the balustrade line, panel positions and fixing locations on your site plan.
Check all panel sizes carefully before installation. Toughened glass cannot be cut or altered once manufactured.
Marking Out
Use a stringline or chalk line to mark the finished balustrade line.
Mark each glass panel edge and allow consistent gaps between panels.
Mark all spigot, standoff or side mount fixing positions and double-check the layout before drilling.
Installing Spigots & Fixings
Install and level the end spigots or fixing points first.
Run a stringline between the end positions to keep the remaining fixings aligned.
Complete the remaining base plate, core drill, side mount or standoff fixings to suit your selected system.
Installing Glass Panels
Carefully lift each glass panel into position and secure it in the selected fixing system.
Avoid glass-to-glass contact during installation.
Adjust each panel so the glass is level, plumb and evenly spaced before fully tightening the fittings.
Installation Details
Panel Gaps
Regulations require gaps not exceeding 100mm. Most professional installers recommend 30–60mm for best appearance and safety. Keep panel spacing consistent across the balustrade for a clean finish.
Spigot Positioning
Generally 200–300mm from the spigot centre to the nearest panel edge.
Simple rule: panel width ÷ 6 (e.g. 1200mm ÷ 6 = 200mm).
Distance between spigots must not exceed 1200mm.
Panels over 1800mm wide require 3 spigots.
Mark all spigot positions before drilling and keep the fixing centres aligned.
Core Drill Installation
Drill a 70–80mm diameter hole to a depth of 100–150mm (depending on the spigot type). Check the floor level, position the spigots, and then fill with non-shrink grout.
Side Mount Installation
Two installation options are available:
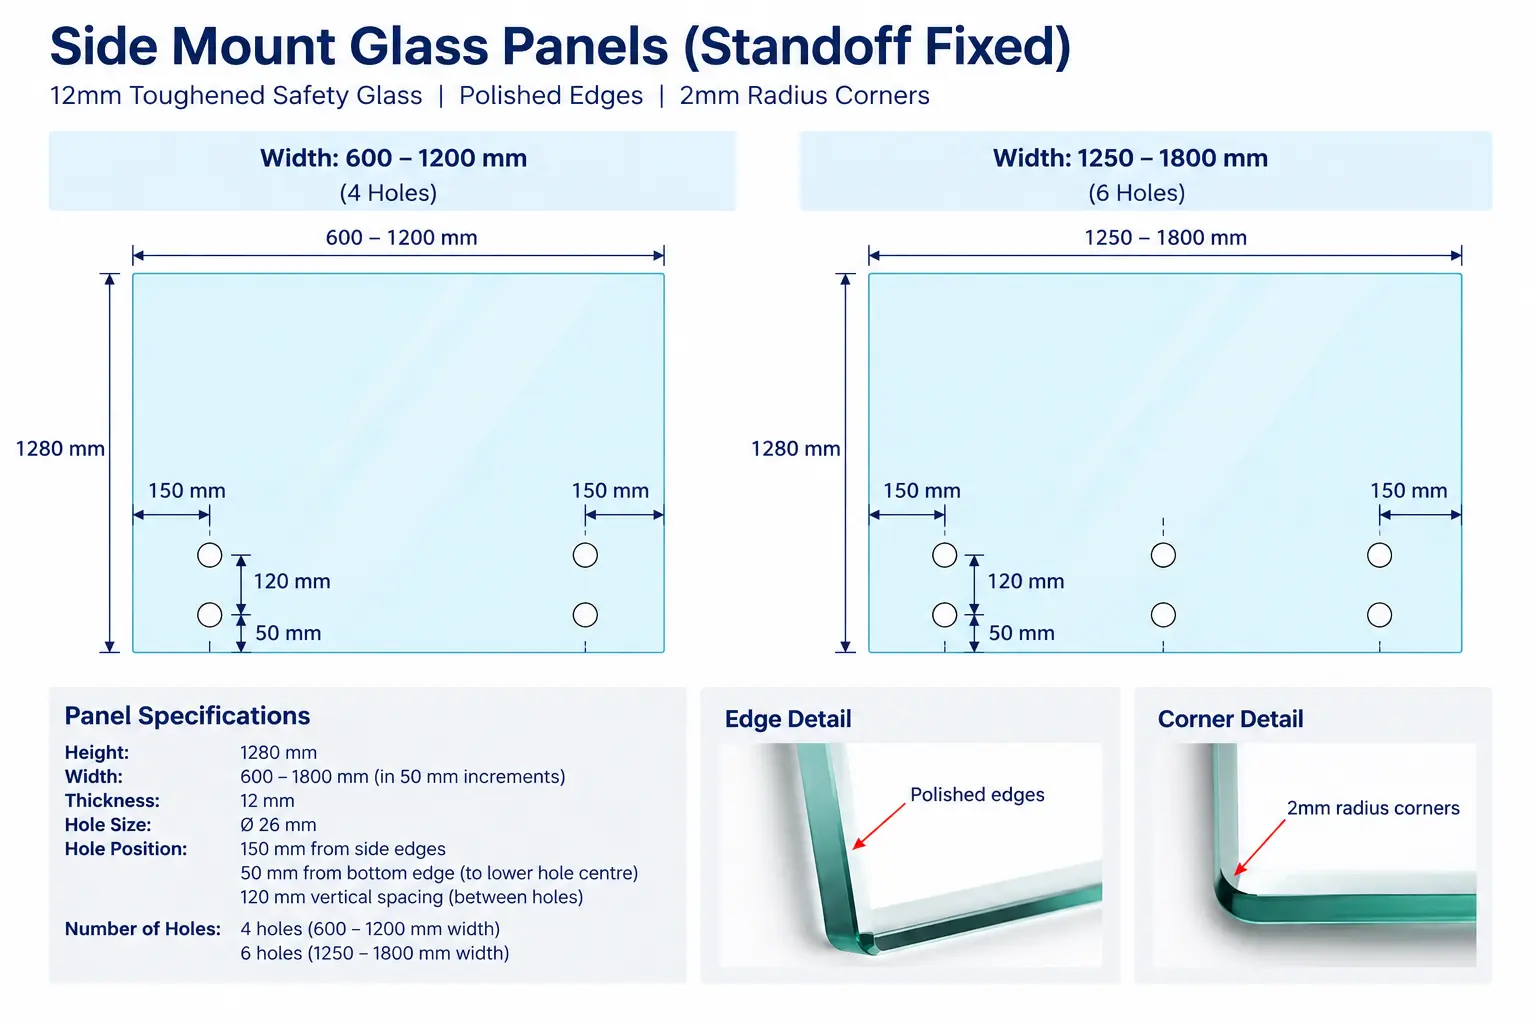
Standoff Pins – A traditional and popular side-mount system. The glass is pre-drilled and fixed directly to the side of the supporting structure using stainless steel standoff pins.
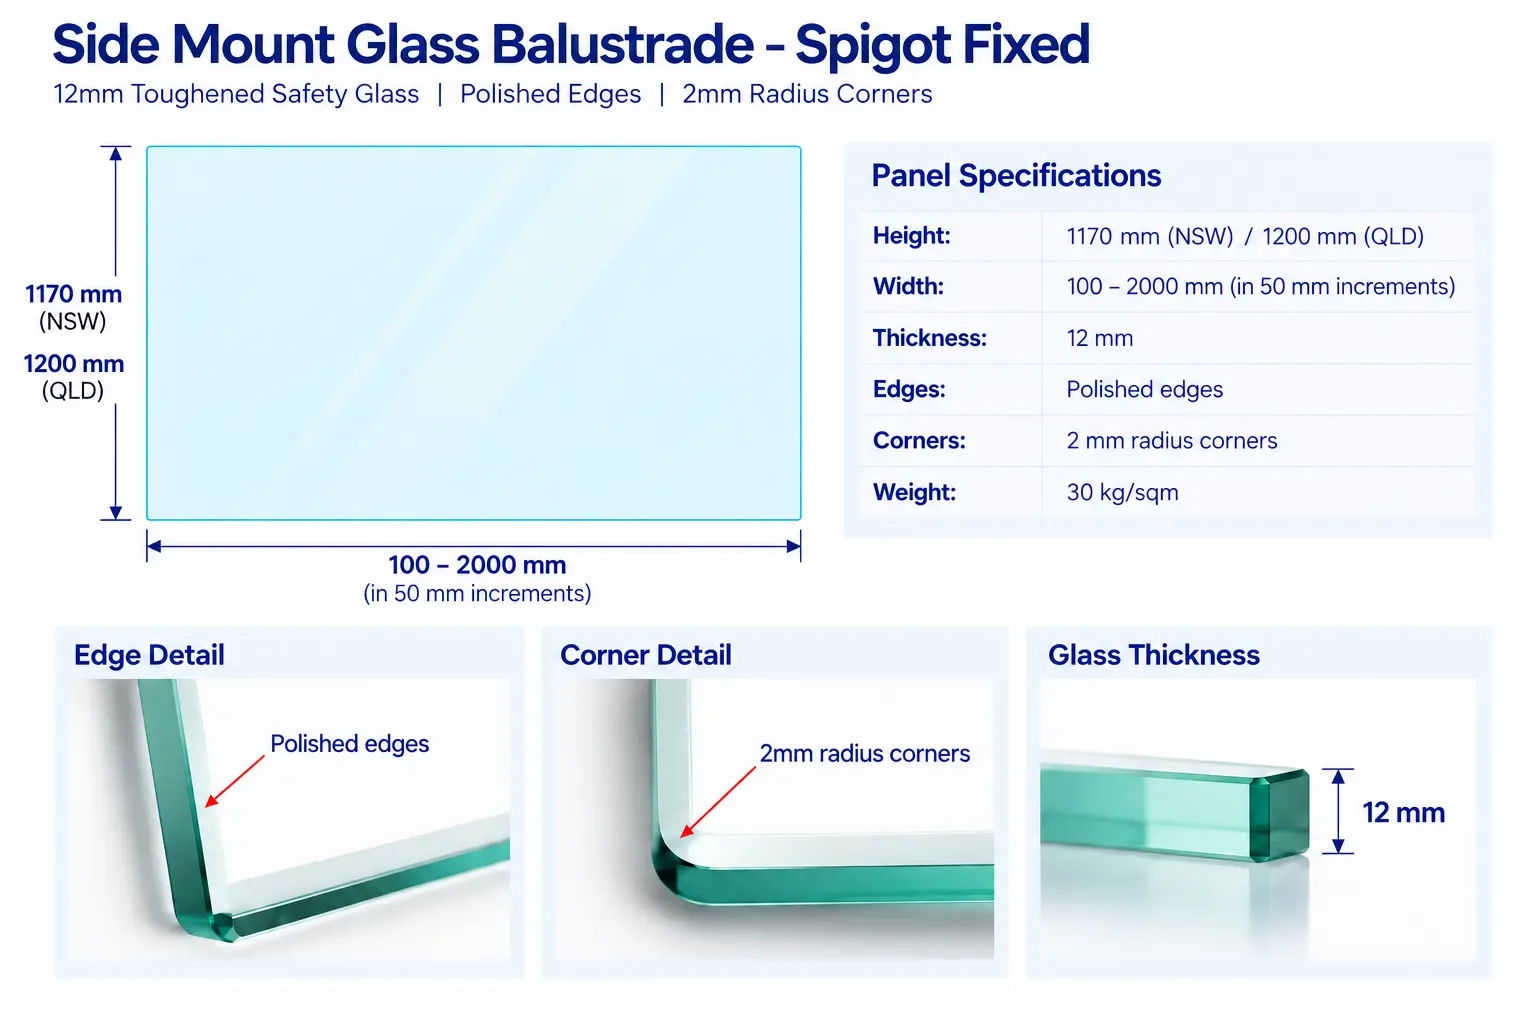
Side Mount Spigots – A newer and easier installation option using friction-fit spigots. No holes are required in the glass, making installation and glass alignment simpler.
Glass Stair Installation
Stair glass panels require accurate measurements to suit the stair angle and fixing locations.
Email your drawing with measurements to sales@factoryonline.com.au , or make a full-size template using 3–6mm MDF board or plywood.
Please ensure all dimensions, angles and fixing holes are accurate before manufacturing.
Final Adjustment
Check that all glass panels are level, plumb and aligned.
Check panel gaps and the overall top line before final tightening.
Complete all final adjustments and make sure all fittings are securely tightened.
Top Rail & Handrail
Measure the rail after the glass panels have been installed and fully aligned.
Cut and fit the top rail or handrail using the appropriate connectors, brackets and rubber inserts for your system.
03 — Certificates & Compliance
Toughened Glass Certification
Our toughened safety glass is supplied with material compliance certification to AS/NZS 2208:2023 Grade A – Safety Glazing Materials in Buildings.
The certificate shown below is a sample only. A formal material compliance certificate for the supplied glass can be issued after delivery.

Glass Balustrade System Certification
Sample compliance documentation for selected glass balustrade systems and components.

Quality Standards & Compliance
AS/NZS 2208:2023 applies to safety glazing materials used in buildings, including toughened safety glass.
AS 1288:2021 – Glass in Buildings: Selection and Installation covers the selection and installation of glass in building applications, including glass used in balustrades.
Glass used as a barrier may also be subject to structural loading requirements and other applicable NCC and Australian Standard requirements depending on the project.
Material Certificates vs Installation Certification
Factory Online is a materials supplier. We provide material compliance certificates for the glass and products supplied where applicable.
Material compliance certification is separate from certification of the completed glass balustrade installation.
The installer, builder or relevant building professional is responsible for ensuring that the completed balustrade is correctly selected, designed and installed for the specific project and complies with applicable standards and building requirements.
Project-Specific Certification
Depending on the balustrade design, fixing method, supporting structure and site conditions, project-specific engineering or certification may be required.
Please check with your installer, builder, structural engineer or third-party building certifier for project-specific compliance and certification requirements.
04 — Technical Specifications
Glass Panels
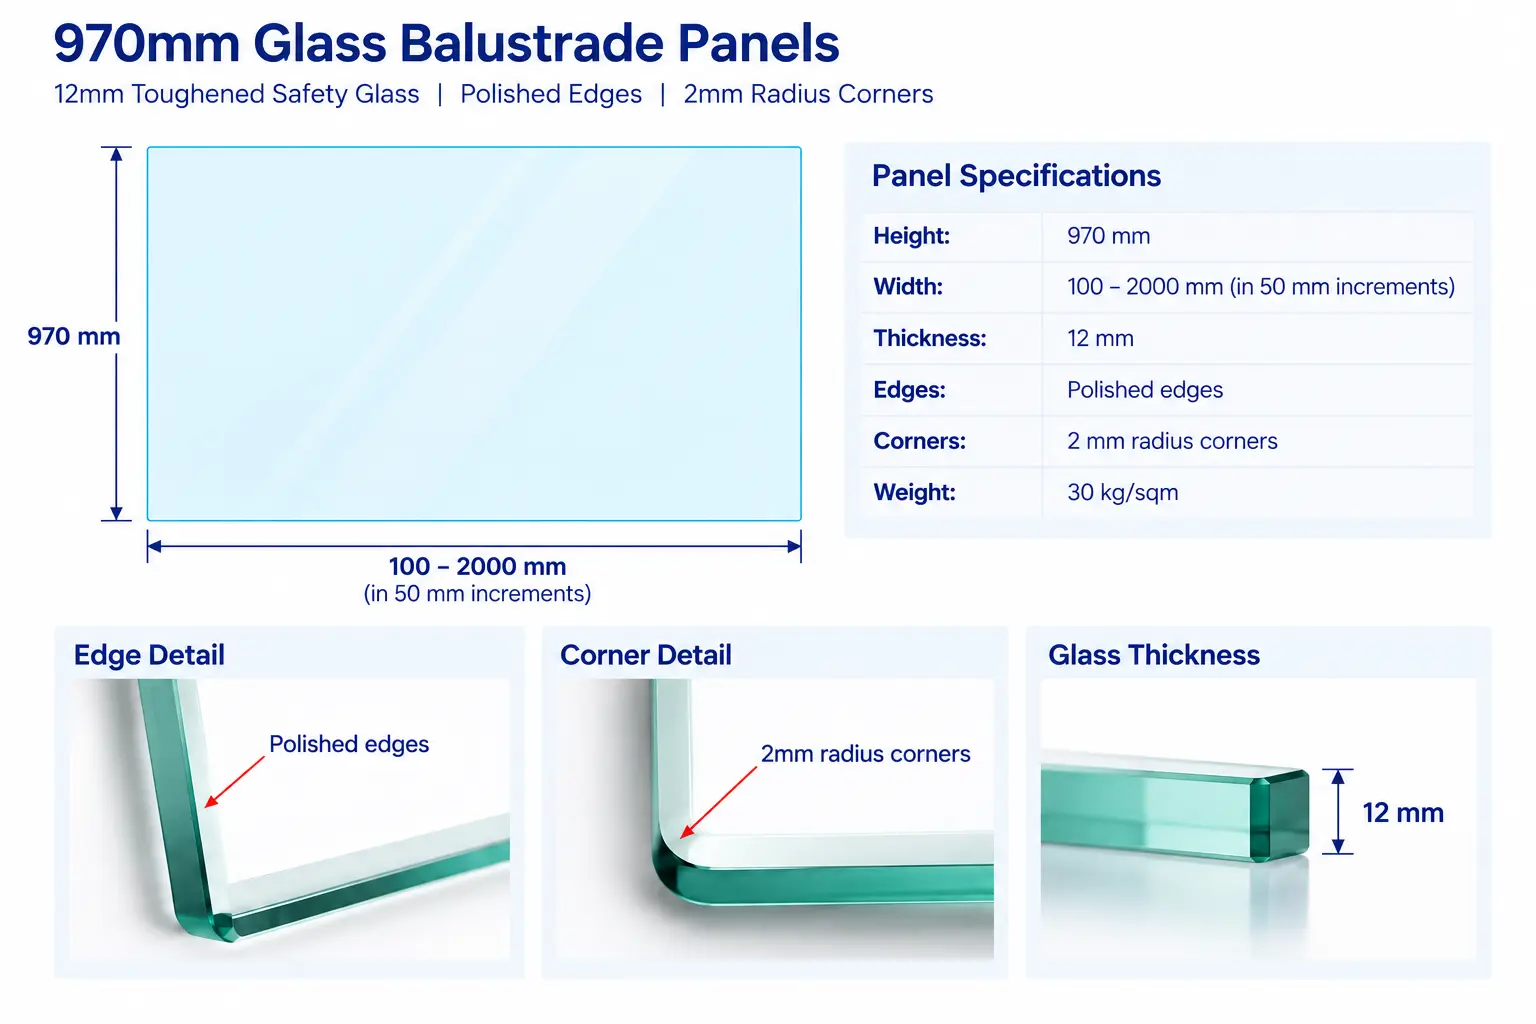
12mm clear toughened safety glass with polished edges and 2mm radius corners. Panel sizes and fixing details vary depending on the balustrade system.
Spigots
View our deck mount, core drill and side mount spigot options, including product specifications and fixing information.
Top Rail & Handrail
View available top rail and handrail systems, fittings, joiners, brackets and accessories.
Glass Clamps
View glass clamp options and specifications for selected balustrade and glass applications.
05 — Frequently Asked Questions
How high does the glass balustrade need to be?
What is the recommended gap between panels?
Do I need to install a top rail?
How to fix core drill spigots?
How far from the spigot centre to the panel edge?
Generally, position the spigot centre approximately 200–300mm from the nearest panel edge.
- Simple guide: panel width ÷ 6.
- For example: 1200mm ÷ 6 = 200mm.
- Distance between spigots should not exceed 1200mm.
- Panels over 1800mm wide generally require 3 spigots.
What is the delivery lead time?
- Sydney & Brisbane metro areas: typically 2–4 working days.
- Other delivery areas: typically 3–7 working days.
Delivery times may vary for bulk orders, custom glass and peak periods.
How much does custom raked or stair glass cost?
Do you deliver glass? What areas do you cover?
Yes. Glass is delivered using purpose-built A-frame glass trucks to keep the panels upright during transport.
NSW: Sydney, Central Coast, Newcastle, Wollongong and selected South Coast areas.
ACT: Canberra area.
QLD: Brisbane, Gold Coast and Sunshine Coast metro areas.
06 — Care & Maintenance
Glass Cleaning
Clean glass regularly using clean water, a soft cloth or sponge and a mild detergent. Avoid abrasive cleaners, metal scrapers and harsh chemicals that may scratch or damage the glass surface.
Stainless Steel Maintenance
Stainless steel spigots, clamps and fittings should be cleaned regularly to remove dirt, salt and other surface contaminants. Wash with fresh water and a mild detergent, then rinse and dry.
Tea Staining
Tea staining can appear as brown surface discolouration on stainless steel, particularly in coastal or high-salt environments. Regular cleaning helps reduce surface contamination and maintain the finish.
Coastal Areas
Balustrades installed near the coast or in areas exposed to salt spray may require more frequent cleaning. Rinse glass and stainless steel components with fresh water regularly to remove salt deposits.
Black Finish Hardware
Clean black-finish hardware with a soft cloth, fresh water and mild detergent. Avoid abrasive pads, solvents and strong chemicals that may damage the surface finish.